Friday 21 December 2012

New products


I was always scared of experimenting when creating new things, can't explain why. I suppose I didn't want to be disappointed with the result. Finally I liberated myself from thinking this way and yeah, now I haven't got enough time for all my projects! It's unbelievable how greatly we can limit ourselves..

Posh Cat series is the effect of my new way of thinking. They are brooches and will soon be available in my etsy shop


Sorry for the bad quality, I took the photos with my phone :)

Wednesday 19 December 2012

Dr. Seuss Philosophy

I never heard of Dr. Seuss before, I must admit. I came across it while browsing the net and I'm so glad I did. Now I'm addicted. Here's 30 reasons why...


I always try to stay optimistic, against all odds. And when it gets difficult I read Dr. Seuss. "Cat in the Hat" goes on my Christmas wish list (seriously this list is starting to be veeeeery long..)

photo source (yep, got that one! only because it's written on it..) 

Tuesday 18 December 2012

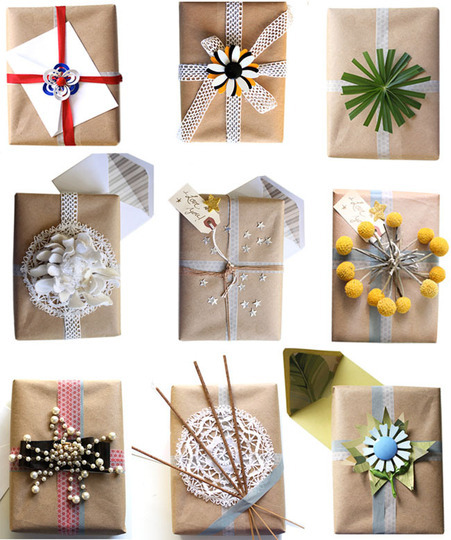
How to wrap your Christmas presents

When it comes to wrapping Christmas presents I like to make it original without spending fortune on fancy wrapping paper. Here's few ideas on how to beautifully wrap Christmas presents using plain packing paper, newspaper or old maps and some extras - hope that this will inspire you to create something special this year.


 handmade hearts for packages Handmade Cinnamom Heart Tied Gifts


DIY kraft paper gift wrap 


Step Five 


As for me.. well, I can't start wrapping my presents, cos I haven't got any yet. Everyone will get a book. Books always make good presents. Plus I cant always read them later!

The photos used for this post do not belong to me. I have a large collection of photos I found on the internet, however I didn't save the links to them. If any of the photos are yours, please contact me and I'll be very happy to put a credit for you.
I use Pinterest now for my photo collection so will have the links for photos I use from now on. 

Sunday 16 December 2012

Salt dough angels


Finally put some of my salt dough angels for sale on etsy. You can buy them here, or click on any of the above photos. More coming this week!

If you missed my tutorial on how to make salt dough angels just click here. Have fun!

Home


Mr Hubby and I went to visit my family last weekend. We went for a walk with my father to a nearby forest. It was really cold (-20C!) but absolutely beautiful. We had some lunch and my very special secret tea. It was great! I want more days like this...
Apart of that it's been a very busy week. And I still haven't managed to do everything I planned. Weeks should have more days. Hope you had a great week and a relaxing weekend!

Saturday 8 December 2012

On my Christmas Wish List


While searching the web for Christmas inspirations I came across those sweet cuties by Camila Prada. Now I want them. You see this Mr Hubby? 


What's on your Christmas Wish List? 

Friday 7 December 2012

Simple Christmas decor

I found those pretty photos on real living. I love how just with few touches they were able to create such beautiful Christmas spirit. Now I want that too. Well, my "Christmas to do" list is getting longer and longer every time I'm on the web..


Christmas sale!


We have 20% off on all our Christmas products and stocking fillers! Check it out on:
www.keekodesigns.com. It's all things pretty for magical Christmas!


Wednesday 5 December 2012

Cold evenings special hot chocolate

I love those long, cold evenings. Just wrap myself in a cosy blanket with a book in one hand and one of my "special winter drinks" in the other. 
Today I'll share my favourite hot chocolate recipe with you. I think it was my mum that invented it and it was our Sunday morning drink when we were kids. It's really delicious, sweet and super easy - hope you will like it too!


Ingredients: 
- full fat milk
- dark cocoa powder / unsweetened cocoa
- sugar
- egg

How to:
1. Measure 3/4 cup of milk and heat it up.
2. Meantime beat egg white, when it starts to get stiff add a tablespoon of sugar and continue beating. Keep on adding sugar and beating until it becomes stiff. You may add some vanilla sugar at this point if you want. I usually use three tablespoons of sugar at this stage.
3. Add two tablespoons of sugar to egg yolk and beat together until smooth.
4. Make the cocoa - put two teaspoons of cocoa powder in a mug and mix with little hot water, then add hot milk. Leave some room for your "fluffy egg".
5. Put beaten egg white on your cocoa, then pour the yolk on top.
6. Get a good book, sit comfortably and enjoy! 

Tips:
Don't sweeten your drink as the "fluff" is already quite sweet.
To spice your drink up just add 1/2 teaspoon of chilli, 1/4 teaspoon of ground nutmeg, 1/4 teaspoon of ground cloves, and 1 teaspoon of cinnamon.


Please read: I always pour boiling water over raw eggs before I use them to reduce the risk of salmonella contamination. For more information about safe use of raw eggs please read this article.

Tuesday 4 December 2012

Alternative Christmas tree

I'm starting my Christmas preparations a little earlier this year - knowing myself I will run out of time anyway and half of the things will stay on my "Christmas To Do List". One of the things I really need to think of now is my Christmas tree. There is this tradition in my family that we dress the tree on the 24th, before we have very traditional dinner (and we start eating when we spot the first star!). This is going to be Mr Hubby's and mine first "married" Christmas and I just want it to be perfect.. We still live in his mother's house, in Mr Hubby old room so there isn't much space for Christmas tree. Let's face is - it's either the tree or we won't have the access to the balcony and I don't think Piri the Cat would like that much. So I need to compromise and make a space saving tree. I found those on the internet and I need to choose one and prepare everything for the 24th - I like traditions. What do you think? Which one?


So this are my inspirations. I really like the last one as it's pretty big (and green). I could add some decorations to it, and fairy lights and all.. My only worry is that Piri and Lola (newest addition to the family) won't let this tree survive for too long.

sources: 1/2/3/4/5

For more Christmas inspirations, ideas and DIY's check out my Christmas Pinterest board.

Monday 3 December 2012

My advent calendar

I actually never had an advent calendar. I mean we had those chocolate ones when we were kids but somehow it never survived the first week..
I wanted to create something original this year, you know, something more than just sweets. As I don't spend much time with Mr Hubby (yes, Mr Boyfriend finally became Mr Hubby!) being constantly busy I decided that this advent we will do something together every day. So I came up with a Date Advent Calendar.
Each one of us wrote secret 12 date ideas and we put them in our advent calendar house. I have to tell you - I am super excited since I had no idea what he prepared for me! 

So this is how it looks like:


I can't take any pictures with my camera right now, so had to use this picture instead. We ordered the houses for our online shop and we loved them so much we jest took one for ourselves. It's made of wood so we will have it for years to come. 

PS. We still have couple of the calendars left, and now they are on sale! 

Friday 30 November 2012

how to make salt dough angels

Hello!
Christmas is less than a month away and I am sooo excited! We prepared few projects and lots of ideas for you - handmade Christmas decorations, gifts and recipes for perfect celebration. We start today with an easy salt dough angels tutorial - enjoy! Oh, and don't forget to come back for more!

Here's a super easy salt dough angels tutorial. They are really cute and would make a perfect gift or Christmas tree decoration.


Mix all of the ingredients together - start with mixing salt and flour, then add water and oil. Kneel the dough for couple of minutes, once it's smooth put into a plastic bag and place in the fridge for 30 minutes.

To start just make 6 balls - one large for the body, two smaller ones for wings, one, even smaller, for the head and two smallest ones for hands.


 * roll the biggest ball flat and cut a circle out using a glass


 Make a hole with a toothpick at the top of the triangular. You can also decorate it at the bottom.

Place the wings on aluminium foil, wet them with a brush and little water and place the skirt on them. Using water will help the pieces to stick together. 

 Make a head and using water stick to the body. 

For the hands make two teardrop shapes and using a knife "make" fingers.

Press the bottoms of the hands with your finger.

 Use garlic press to make hair - just press some dough through it.

 Wet the head and stick hair to it. I usually do it one by one.


 Using a sharp pencil make little mouth - they look like they are singing :)

Bake them in no more than 100C. Too high temperature will cause bubbles to appear and trust me - you don't want that. Let them dry there for couple of hours. Once they are hard enough for you to handle them, take the foil of and put them back in the oven. Keep on checking on them, once they are hard on both sides they are ready.

I made a whole bunch of them for my Esty shop - just need to paint them now.

Tips:
  - do not leave the dough outside of plastic bag for too long as it will dry up and will crumble which makes it very difficult to work with
- if the dough is too dry - add a little water, if too wet - add some flour
- it is better to make the balls one at a time to make the pieces - if you do all the balls together, they will dry up before you have the time to work with them. 
- I recommend using acrylic paints to finish off the angels
- once you paint the angels cover them with clear acrylic spray or nail varnish 

Search This Blog