Showing posts with label DIY. Show all posts

Tuesday, 21 May 2013

Ombre lamp project

So I painted my lampshade over the weekend and now I really can't decide whether I like it or not. I'm pretty satisfied with the result but on the other hand it was supposed to look better, so I'm a bit disappointed too. Anyway, if you want to give it a try, here's how I did it.


  1. In two bowls mix white paint with chosen colors. If you already have the colors you want to use jump to step 3.
  2. You will need to make two shades of the same color, one dark and one light. Make 1/3 more than you need.
  3. In third bowl combine 1/3 of the dark shade with 1/3 of the light shade to create "middle" shade. 
  4. Paint. I found that the easiest way is to divide the object-to-be-painted into sections, one for each shade, then paint each section starting from its top. When you get to the point where the two shades meet, use a dry brush to blend them together - just go up and down with your brush, something like doing "x" with it until they blend nicely and you no longer see where they met (or until you are satisfied with the result. I achieved neither of that..). Repeat the process for all the sections.
I used a dry brush, then a sponge, then a cloth and finished it off with my fingers. The lampshade I painted was made with thin paper and because of that, and because it was a bit awkward to hold and paint it (and because it had wires all over, and it was round, and it was my first project) I didn't really blend it very well. But hey, Mr Hubby totally loves it so it's all good!


TIPS:

  1. You can choose any colors you like, they don't have to be shades of one color as you will blend them together with your "middle" color.
  2. You can use the technique to ombre paint pretty much everything, even walls.
  3. In case of painting large objects I'd recommend adding an extra section between two sections that you are going to paint, for example for three shades you would need five sections. Use the blank sections to blend the colors together - in that case you will have equally divided colors as you will pretty much create two extra shades when blending the ones you already have. Hope that makes sense. *I haven't use this technique yet so I'm not sure if that would work well.*
  4. The easiest way to ombre paint a round lampshade is to paint spray it. Just simply spray it from the top and it will nicely leave you with an ombre effect. I didn't have the spray in the color I wanted.  

If you have any questions or suggestions on how to improve this project, please leave a comment below. Thank you!

P.S. As you may or may not noticed I haven't put any photos of my finished lamp. I simply haven't taken any yet and was hoping to do that this morning but it's raining outside and it's really dark in my room now, so I didn't manage to take a good shot. Will do so asap! :) 

Tuesday, 18 December 2012

How to wrap your Christmas presents

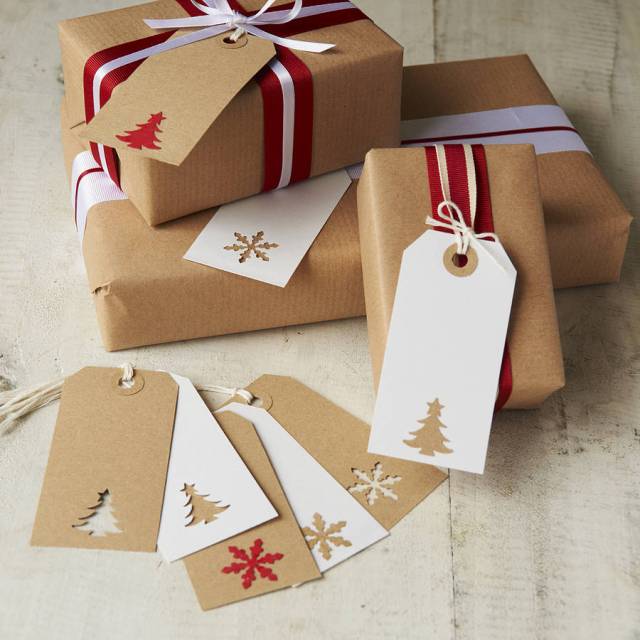
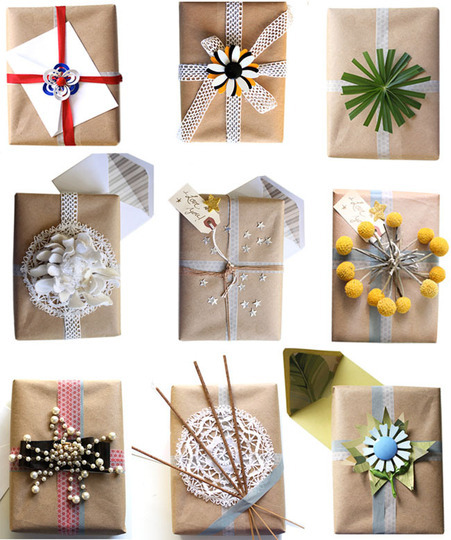
When it comes to wrapping Christmas presents I like to make it original without spending fortune on fancy wrapping paper. Here's few ideas on how to beautifully wrap Christmas presents using plain packing paper, newspaper or old maps and some extras - hope that this will inspire you to create something special this year.


 handmade hearts for packages Handmade Cinnamom Heart Tied Gifts


DIY kraft paper gift wrap 


Step Five 


As for me.. well, I can't start wrapping my presents, cos I haven't got any yet. Everyone will get a book. Books always make good presents. Plus I cant always read them later!

The photos used for this post do not belong to me. I have a large collection of photos I found on the internet, however I didn't save the links to them. If any of the photos are yours, please contact me and I'll be very happy to put a credit for you.
I use Pinterest now for my photo collection so will have the links for photos I use from now on. 

Friday, 7 December 2012

Simple Christmas decor

I found those pretty photos on real living. I love how just with few touches they were able to create such beautiful Christmas spirit. Now I want that too. Well, my "Christmas to do" list is getting longer and longer every time I'm on the web..


Friday, 30 November 2012

how to make salt dough angels

Hello!
Christmas is less than a month away and I am sooo excited! We prepared few projects and lots of ideas for you - handmade Christmas decorations, gifts and recipes for perfect celebration. We start today with an easy salt dough angels tutorial - enjoy! Oh, and don't forget to come back for more!

Here's a super easy salt dough angels tutorial. They are really cute and would make a perfect gift or Christmas tree decoration.


Mix all of the ingredients together - start with mixing salt and flour, then add water and oil. Kneel the dough for couple of minutes, once it's smooth put into a plastic bag and place in the fridge for 30 minutes.

To start just make 6 balls - one large for the body, two smaller ones for wings, one, even smaller, for the head and two smallest ones for hands.


 * roll the biggest ball flat and cut a circle out using a glass


 Make a hole with a toothpick at the top of the triangular. You can also decorate it at the bottom.

Place the wings on aluminium foil, wet them with a brush and little water and place the skirt on them. Using water will help the pieces to stick together. 

 Make a head and using water stick to the body. 

For the hands make two teardrop shapes and using a knife "make" fingers.

Press the bottoms of the hands with your finger.

 Use garlic press to make hair - just press some dough through it.

 Wet the head and stick hair to it. I usually do it one by one.


 Using a sharp pencil make little mouth - they look like they are singing :)

Bake them in no more than 100C. Too high temperature will cause bubbles to appear and trust me - you don't want that. Let them dry there for couple of hours. Once they are hard enough for you to handle them, take the foil of and put them back in the oven. Keep on checking on them, once they are hard on both sides they are ready.

I made a whole bunch of them for my Esty shop - just need to paint them now.

Tips:
  - do not leave the dough outside of plastic bag for too long as it will dry up and will crumble which makes it very difficult to work with
- if the dough is too dry - add a little water, if too wet - add some flour
- it is better to make the balls one at a time to make the pieces - if you do all the balls together, they will dry up before you have the time to work with them. 
- I recommend using acrylic paints to finish off the angels
- once you paint the angels cover them with clear acrylic spray or nail varnish 

Friday, 20 April 2012


I finished the project last night but couldn't take good photos until this morning.. So with a little delay here it comes: super easy photo holder DIY.


1. Supplies needed: some stones, washed and dried; easy to fold wire; brushes and paint. I used acrylic paint and it covered the stones perfectly. You can also spray the stones with clear spray once they are painted and dried - it would add some shine and make the colours brighter.

2. Paint your stones in chosen colours.

3. Wire the stones around as shown on the photo. Do the top loop by wiring around a pencil.

4. Add your photos and ta-da! You have an original photo didplay!

Tips:
You can leave your stones unpainted to create a natural look.
Use black and white photos if your stones are colourful.
Paint one side of a stone, wait until dry and paint the other side. 
You can paint your stones all in one colour to match your interior deco.
The holders are great as table number holders!


Have fun and see you soon!


Monday, 16 April 2012

A pallet shelf

Our room is pretty small and although we love being surrounded by lots of pretty things, we can't put too much in here as it will look too cluttered. I wanted a simple, yet original shelf were I could display my favourite items.

So we came up with this simple pallet shelf. It was very easy to make and - the best part - it was free.


  Leon too wanted to be photographed


The little dwarfs are from the shop - they make me smile and they remind me of how lucky I am to follow my dreams!

Sunday, 12 February 2012

Heart garland DIY

Heart decoration DIY

I made my pink garland for The Sweetest Date using this tutorial. It's dead easy and very effective. Have fun!


This is not my tutorial! I found it on the internet some time ago and saved it. But I forgot to write where I found it! If this is your tutorial, please let me know and I'll be very happy to source it or put a link to your website/blog. 

Saturday, 11 February 2012

Cute tea bags

Valentine Gift DIY


This is a very easy project and a great present for your Valentine! I simply adore hand-made presents - they're very special and you know that whoever made it put thought and effort to it. Plus, whenever I make presents for a friend or family, I think about them the whole time. It somehow brings me closer to them :)


How to do it:
You will need: colour paper, a needle, paper heart (to use as a pattern), pencil, scissors, glue, tea bags.


1. Draw and cut little hearts out.


2. Take the original tag off, cover one side of a heart with glue, put the string in the middle and cover with another heart. 


 3. If you want to create your own tea mix: carefully open a tea bag - make sure you don't tear it.


 4. Empty the bag - you can now use it for your mix.


 5. Mix your tea. My all time favourite is roiboos, peppermint and lemon. You can use loose tea and mix it with spices, or do what I did: I only had tea bags, so I simply opened them and mixed the tea together.


 6. Put your mixture back into a bag and close it with its original string. Put your paper heart at the end of a string.


7. You can paint the box you bought your tea in and stick little hearts on it or write a message for your Valentine, or just put it in a nice box. I simply run out of time to do it. (and I drunk all the tea myself...)

Search This Blog